


This will help you to set up your sounds on mIRC so you can hear and get the sounds that others play on the channel

 Setup sound folders
 Setup DCC
 Setup sound

Okay the first thing most people make a mistake in is not setting up there DCC and making folders to hold the different Sounds *.wav and *.mid
So we are going to show you the right way to setup your sounds for easy access and maintanence. With a little work up front it will save you a lot of work later and housekeeping of your sound folders and other folders
Okay first thing we need to do is to click on The icon on your main besk top Called My Computer. Select the drive you installed mIRC on it is most likely the C drive. Now when you find the mIRC folder where you installed mIRC double click on it. This should show you at least one folder inside it called downloads and a bunch of other files.
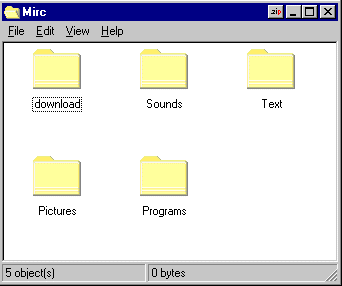
You won't find all the folders that you see in the above picture in your mirc folder. Instead we are going to add them. Just click on File then select New and then Folder. This will make a new folder in the mIRC Folder window you have open.
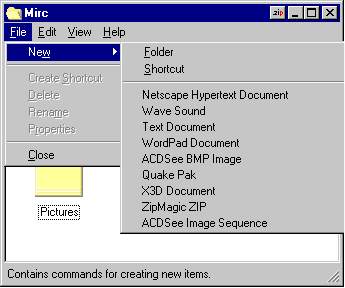
Make sure you do not have a folder selected when you click on new cause if you do you will not get the New menu command. If you don't get the New menu just click on white part of the window and then click on file again and it should be there.
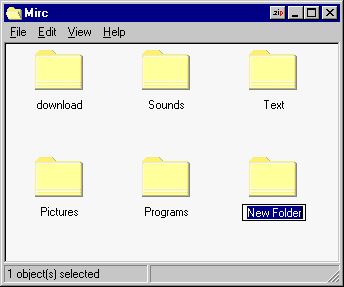
When you create a new folder the name will be hilited and flashing. Just type in a new name. You can call your New folders Sounds, Pictures, Text and Programs Like I have
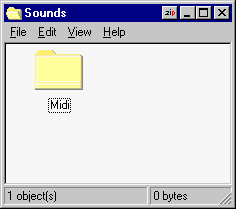
Now double click on the Sound Folder to open it up we are going to make a new folder inside of it for Midi Sound files.
The reason for making these folders is to keep files of one type all in the same place and away from the others. It is mainly just good house keeping. And it will make you life a lot easier later on.
Now you can close all the windows we have opened up and get ready to go to the next step
Okay we are now ready to setup the DCC in mIRC
So we are Now going to setup the DCC ( Direct Client Connection ) This is how mIRC downloads files from other people and then directs them into the right files.
Okay first thing is open up mIRC and click on the DCC in the top menu
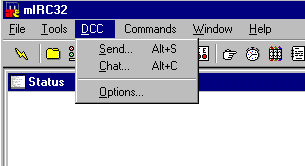
Then select Options a new window will open up called mIRC DCC Options. Select the tab Called Dirs
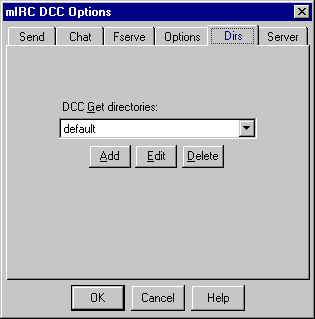
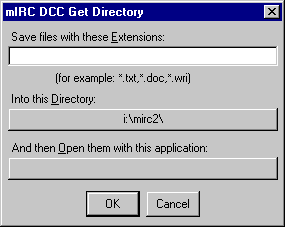
In this menu select the add button and another window will open up called mIRC DCC get Directory. Here is where we will tell mIRC where to send files with certian File ext like .wav , .mid , .txt , .gif and so on.
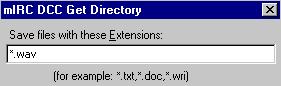
We will now type *.wav into the top window as in the example below.
Next step is to set the path to where we want mIRC to save the wav file we are downloading. So we must then click on the button below into this Directory
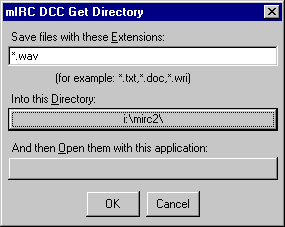
A new Window will open up here we can select the new folders we have created. Since we are setting up the path for wav files we will select the sound folder
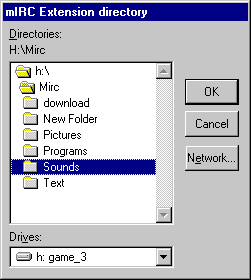
Hilite the sound folder and click okay. You can now repeat these steps Clicking on add then typing in *.mid and double clicking on sound to bring up the Midi folder we created inside of the Sound folder.
Once you have added a Path for all the different files to the corresponding folders eg: *.txt sent to Text folder and *.gif,*.jpg to The picture folder (note: That you can send more than one type of file to a Folder by seperating them with a comma , ) and also set up a path for *.ini,*.mrc to the program folder this will be needed if you ever want to get scripts from someone else but, don't want them mixed in with your regular script files in mIRC
Now that you have finish setting up the DCC paths for downloading files just click on okay until all the windows are closed and you are back to the main mIRC window
Now we are ready to finally set up and activate sounds in mIRC
Okay click on File in the menu then select options
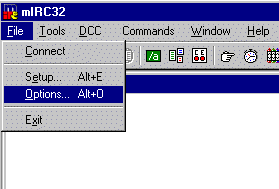
A new window will open up called mIRC Options. Select the Tab called Sounds
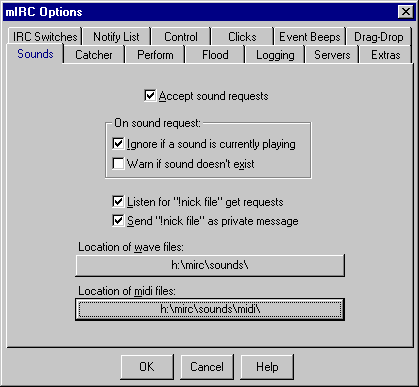
Check the top box Accept Sound Request
The next two boxes you can check them if you want it isn't nessacery
Now if you want to get Sounds from people that play them or send sounds to other people that don't have the sound you have check the next two boxes

Listen for"!nick file"get requests. Will listen for when another person asks for a sound file you sent and they do not have and send it to them if this box is checked
The Send "!nick file" as private message. Will send a request to a person that has played a sound you do not have and ask for them to send it to you if you have it checked
these are the !Canuckie funny.wav msg you occasionally see on the screen after a person has played a sound.
Next we have to setup mIRC an tell it where to look for the sounds we want to play and that is what the next two buttons are for. The first one allows you to set up the mIRC sound path to the new sound folder we created earlier. Just click on it an select the sound folder like we did in setting up the dcc

An select the sound folder and click okay
Do the same for the midi Location and select the midi folder inside of the sound folder we Created earlier
Now close all the windows by saying yes do not click cancel unless you want to cancel all the changes you made and do not use the top right X to close the windows
We are now done your sounds are all set up and you will now be able to play and get sounds that others play on the channel.
To play sounds all you have to do is type /sound filename.wav and it will play the file you typed. And if you want to turn the sound off all you have to do is type /sound off or /sound on to turn it off or on.
Well we are all done with setting up the sounds have fun :o)
 Back to the top